Search for tool returned 12 results.

About Tool Database

February 15, 2016, 8:41 pm by admin

An integral part of HSMAdvisor is its powerful Tool and Cut Database.

Tool Database allows you to store your tools in one convenient location, sparing you the time needed to key in your tool type, size, etc.
It is very flexible and, since its inception, has grown both in size and functionality.

With every update, the list of its features keeps growing, and at present, it can (among many other things) do the following:

  • Store and Edit geometric Tool data, Including automatic creation of tool data from a sample tool entry.
  • Store/Create/Manage Custom Tool Manufacturer Cutting data using Manufacturer Brand/Series names.
  • Store and Manage Tool Handling data like Number of Tools in stock, Ordering Vendor Information, Physical location in the shop
  • Set up Low Tool Stock warning levels and add tools that are low on the stock to a Request List to be ordered.
  • Create and Export customizable Tool Request Orders for use in purchasing.
  • Restock received tools into the Tool Database
  • Attach Cutting Data (Known as just "Cuts") to tools for various cutting scenarios in different materials.
  • Store complete MasterCAM Tool and ToolPath parameters for easy importing/Exporting of MC operations
  • Organize Tools into Libraries
  • Share a single Tool Database between many HSMAdvisor seats in real-time.
  • Import Tool Databases from Fusion 360 in .hsmlib (HSMWorks) format.

 In the following articles, we will describe the main functions of the Tool Database.
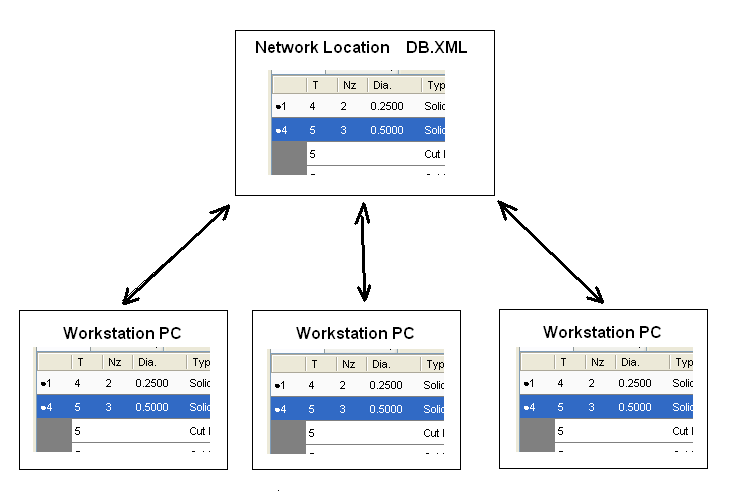
HSMAdvisor Units System (in/mm)

September 28, 2016, 7:42 pm by admin

HSMAdvisor supports both imperial (in) and metric (mm) measurement systems.

You can switch between the two systems for each field on the Speeds and Feeds page by clicking on the in/mm label next to the field.

Some fields can be imperial while others are metric, and that's fine.

There are two global switches on the Speeds and Feeds page that allow you to quickly change all units on the page to either inches or millimeters.

The Input in/mm label changes the units for all Tool Geometry and Cutting Parameters fields, while the Result in/mm label changes the units for all Speeds and Feeds and Gauges fields.

On the Machine Profile page, the app starts up in imperial mode and you can toggle between imperial and metric values. The unit system selected in the Machine Definition page will not affect the speed and feed calculations and the app will handle all conversions internally. You only need to make sure the numbers are correct for the selected unit mode.

See also

Select Tool Type, Tool Material and Coating

September 21, 2014, 11:01 pm by admin

Choose your Tool Type, Tool Material and Tool Coating

Cutting parameters depend not only on the type of tool you are using, but also on the material it is made of and its coating.

We have the largest number of tool types, tool materials and coatings to choose from than any other Speed and Feed calculator out there

Tool Types

Here is the list of currently available tool types:

End Mills

  • Solid End Mill
    A regular finishing or medium-machining end mill. Not suitable for deep or heavy cuts.
  • HP/Roughing End Mill
    A High Performance or Roughing end mill capable of deep cuts.
  • Indexed End Mill
    An end mill with replaceable edges or inserts. Usually Roughing.
  • Indexed Face Mill
    Another Type of cutting gool with replaceable inserts designed to clean up large horizontal surface area of the workpiece.
  • Helical Indexed End Mill
    A multiple flute indexed mill with large flute length capable of narrow but very deep cuts.
  • High Feed Mill
    An indexed or solid end mill, with very shallow lead angle, that utilizes axial chip thinning effect allowing it to achieve very high feed rates comparable to tools of equal size and length.
    This Tool Type  requires user to turn on Chip Thinning compensation in the Comp. panel
  • V-Bit Engraver
    A normally single flute solid end mill normally used for engraving.
  • Chamfer Mill
    Another type of solid or indexed mill that has particular Lead Angle and is normally used to add chamfers to sharp corners on your workpiece.

Drills

  • Jobber Twist Drill
    A regular solid twist drill, nothing special.
  • Hi-Helix Parabolic Drill
    A drill that has special geometry allowing it to drill deeper holes with fewer peck cycles.Usually features higher flute helix, split drill point, thicker core and rolled heel.
  • Spade Drill
    A drill with single replaceable cutting tip that looks like a spade.
  • Indexed Drill
    A drill that has 2 staggered indexable inserts. One located closer to the center, the other- to the outside.
    This drill type has only ONE effective cutting edge.
  • Straight Flute for Hard Metal
    A drill that has straight flutes and used primarily for hardened steels and is unsuitable for soft materials.
  • Reamer
    Regular reamer - tool that is used to finish holes to high degree of dimensional accuracy and surface finish.
  • Counterbore
    A tool, usually with a pilot tip that is used to create a recess in a surface of a workpiece in already-existing hole for a head of a screw to fit in.

Threading Tools

  • Thread Mill
    A milling tool thats sole purpose is to mill internal and external threads onto already existing features like holes and bosses.
  • Forming Tap
    A tap that uses forming action to form a thread in a drilled hole.
    threads produced this way tend to be stronger and tool itself tends to have longer life.
    Recommended for malleable materials under 40RC (400HB) in hardness.
    Tap holes need to be drilled to larger size than for regular cutting taps.
  • Tap
    A regular Tapping tool.

Turning Tools

  • Boring Bar
    A tool used to increase internal diameter in a drilled or milled hole.
  • Turning - Profiling
    A turning tool that is used for either profiling or facing.
  • Turning - Grooving
    A grooving tool that is used to produce narrow cylindrical grooves by plunging into the material.

Tool Materials

Here is the list of available tool materials:

  • HSS
    High Speed Steel - invented in the old times when using it really meant high speeds.
    Since the advancements in metallurgy with tough to machine materials becoming more common, its use for milling tools is limited to mainly non-ferrous alloys and plastics.
    Drilling tools, especially Reamers and Taps are still, however are made of HSS
  • HSCoblat
    A variation of HSS that has higher Cobalt content (usually 8%) giving it higher hardness at high temperatures.
  • Carbide
    Tungsten Carbide - an extremely hard cutting material capable of maintaining its properties at high cutting forces and temperatures.
    There are many different grades of tungsten carbide used for cutting tools and inserts, but for sake of simplicity (really i could have added 5 most used ones. but do you really want me to?) we assume that the carbide grate is suitable to the material AND its application. IE: Do not pick up an end mill designed for Aluminum and try to use it on hardened steel. Not only the cutting geometry will be wrong, but also carbide grade mill likely be different.
  • PCD Diamond
    Polycrystalline Diamond - a synthetic diamond that is used on non-ferrous materials where tool life is very important such as Graphite, Fiberglass and Aluminum.
  • Ceramic
    Ceramic a synthetic material that features extremely high hardness even at elevated conditions.
    It is used to literally liquefy workpiece material at extremely high cutting speeds and relatively low chiploads.
    Used on difficult - to -machine ferrous alloys such as hardened tool steels, hardened stainless steels and super alloys.

Coatings

Here is the list of available coatings:

  • TiN
    Titanium Nitride - a golden- coloured coating used to prolong life of a tool
  • TiCN
    Titanium Cubic Nitride - a high-performance coating that allows to increase cutting speeds.
  • TiAlN
    Titanium Aluminum Nitride  - a high-performance coating that at high cutting temperatures transforms into even harder version of itself.
    Often used dry.Applications range from soft to hardened steels, and from stainless steels to super alloys 
  • AlTiN
    Same as TiAlN, but harder and with higher Aluminum composition.
    Allows higher cutting speeds than TiAlN
  • AlCrN
    Aluminum Chromium Nitride - another high-performance coating widely used on super-alloys for its extremely high hardness and high temperature resistance
  • ZrN
    Zirconium Nitride - Coating used on non-ferrous alloys (mainly aluminums) for its high lubricity and hardness.
    Greatly extends tool life.

Can not find your Tool Type, Tool Material or Coating on the list?

Drop us a line.

See Contact Details for ways to reach us


Tool Material and Coating Application Guide

September 21, 2014, 11:35 pm by admin

Here is a short Application Guide for use of different cutting tool materials and coatings.

Tool Materials and Coatings are listed from least preferable to most preferable.
(IE: line "Recommended tool materials: HSS, HSCobalt, Carbide, Diamond" means that HSS is the least preferable material and Diamond is the Most preferable one)

Tool Material

  • Aluminum and other non-ferrous metals:
    Recommended tool materials: HSS, HSCobalt, Carbide, Diamond
    Recommended number of flutes:2 or 3
    Recommended coolant: Flood Coolant for all tool materials, reduce cutting depth and speed for less than ideal cooling situations
  • Abrasive non-ferrous and non-metall materials:
    Recommended tool materials: HSS, HSCobalt, Carbide, Diamond
    Recommended number of flutes:2 or 3
    Recommended coolant: Flood Coolant for all tool materials, reduce cutting depth and speed for less than ideal cooling situations
  • Mild and Tool Steels
    Recommended tool materials:HSS, HSCobalt, Carbide
    Recommended number of flutes: 4 for regular machining; 4+ for finishing and HSM machining   
    Recommended coolant for HSS and HSCObalt tooling: Flood, reduce cutting depth and speed for less than ideal coolant situations
    Recommended coolant for Carbide tooling: Dry or mist airblast to clear the chips
  • Nikel and Cobalt Ferrous super alloys
    Recommended tool materials:HSCobalt, Carbide, Ceramics
    Recommended number of flutes: 3-4 for regular machining; 4+ for finishing and HSM machining   
    Recommended coolant for HSCobalt and Carbide: High pressure, high volume flood coolant
    Recommended coolant for Ceramics: None
  • Titanium alloys
    Recommended tool materials: HSCobalt, Carbide
    Recommended number of flutes: 3-4 for regular machining; 4+ for finishing and HSM machining   
    Recommended coolant: High pressure, high volume flood coolant

Tool Coating

Coating improves wear and temperature resistance of the cutting edge.
General rules of thumb:

  • Aluminum and other non-abrasive non-ferrous metals
    Recommended coatings:No Coating (bright finish), TiCN, ZrN, TiB
    Recommended coolant: Flood, reduce cutting depth and speed for less than ideal coolant situations
  • Abrasive non-ferrous and non-metall materials:
    Recommended coatings: TiAlN,AlTiN, AlCrN, Diamond
    Recommended coolant: Flood, reduce cutting depth and speed for less than ideal coolant situations
  • Mild and tool Steels
    Recommended coatings:TiN, TiCN, TiAlN, AlTiN, AlCrN
    Recommended coolant for HSS and HSCObalt tooling: Flood, reduce cutting depth and speed for less than ideal coolant situations
    Recommended coolant for Carbide tooling: Dry or mist airblast to clear the chips
  • Nikel and Cobalt Ferrous super alloys
    Recommended coatings:TiN, TiCN, TiAlN, AlTiN, AlCrN
    Recommended coolant: High pressure, high volume flood coolant
  • Titanium alloys
    Recommended coatings:No coating (bright finish); Super hard AlCrN, AlTiN, TiAlN nano coatings
    Recommended coolant: High pressure, high volume flood coolant

Do you think this information is not complete or you need more?

Drop us a line.

See Contact Details for ways to reach us


Entering Cutting Tool Geometry

September 23, 2014, 8:09 pm by admin


Enter Your cutting tool geometry starting with Tool Diameter (Turn diameter for Lathe)
All input fields displayed on the screen are important.

Normally when you change the tool type, default data is loaded from the database.
You can override this behavior in the Settings tab on the Fields and Limits that Reset to Default when Tool Type Changes panel by un-checking Reset Tool Data checkbox

Here are the input fields available for Tool Geometry

  • Tip Dia (Mill, Drill)

    The diameter of the cutting end of the end mill, drill, reamer etc

  • Turn Dia (Lathe)

    The diameter of the finished workpiece.

    When working in CSS and IPR mode it makes sense to keep Turn Dia equal to the actual maximum diameter of the workpiece. If you fail to do so, you may overload the spindle by calculating incorrect depth of cut and feed rate

  • N# of Flutes (Mill, Drill)

    An effective number of cutting teeth on your milling or drilling tool.

  • N# of Inserts (Lathe, Boring Bar)

    Effective number of cutting edges that do work at the same time. IE: some boring bars have 2 inserts

  • Tool Stickout

    The distance from the nose of a tool holder to the tip of the cutting tool.

    For integrated or arbor-mounted tooling, use the distance from the spindle nose to the tip of the tool.

  • Corner Radius

    Corner Radius of the insert or the tip of the tool

  • Flute Length
    Length of the cutting portion of the tool.
    Be careful as some tool types like button cutters do not allow full-depth cuts.

  • Lead Angle of the cutting edge.
    The angle between the cutting edge and a plane perpendicular to the centerline of the tool

    Common values for end mills

    90: regular straight edge
    45: Common angle for face cutters
    5-30: High feed mills

    Lower angles allow increased feed rates

  • Shank Dia
    The diameter of the non-cutting portion of the tool

  • Helix Angle
    The helix angle of the flutes.

  • Shoulder Length
    The distance from the tip of the tool to the shank of the tool. It is often the same length as the Flute Length but is sometimes larger on necked tools.

  • Tapered Shoulder
    Controls how the shoulder portion is displayed and calculated. If it is checked, the shoulder is tapered from the end of the flutes to the beginning of the shank portion.

  • Shoulder Diameter
    The diameter of the tool shoulder. It is often the same size as the Tip Diameter but is sometimes smaller for necked tools such as T-Slot cutters.

This is how the Tool Data Panel looks like for any End Mill Tool Type

Lines have been drawn to show which fields affect which tool features.

Drilling Tool Type Tool Data Panel


Turning Tool Type Tool Data Panel


Tap Tool type Tool Data Panel


Reamer, Counter Bore and Thread Mill Tool Type Tool Data Panel


See Also


Entering/Adjusting Cut Parameters

September 23, 2014, 8:48 pm by admin
 

Enter/Adjust your cutter engagement parameters

The expandable Cut panel is visible when either Milling or Turning Tool Type is selected.

When a Turning tool type is selected, only the DOC input field is visible.

These are the fields available on the Cut panel for Milling tools

  • DOC
    Depth of Cut - Axial depth of cut
  • WOC
    Width of Cut - Radial Width of cut
  • WOC %
    Width of Cut as a percentage from the cutter diameter
  • WOC Deg
    Width of Cut in Degrees with 180 being full with of cut and 0 - none at all

This is how the Cut panel looks for Milling Tools:

When you change the WOC value, WOC-% and WOC-Deg change automatically.

But if you want to change the % or Deg field directly and set an inch or mm WOC, you need to enter your number and then hit ENTER.


For Turning tools, only the DOC input field is available.

  • For Profiling Operations
    Depth of Cut - The radial depth of cut.
  • For Grooving or Facing Operations
    Depth of Cut - Width of the Grooving or Facing pass

This is how the Cut panel looks for Turning Tools:


See Also


Balancing Cutter Engagement

September 23, 2014, 10:31 pm by admin

One of the handiest functions of HSMAdvisor is the ability to suggest Depth of Cut (DOC) and Width of Cut (WOC) based on tool type and user-specified tool geometry.

When Cut data matches the default or ideal data specific for the selected Tool Type, the DOC and WOC fields turn Green in color:

This article describes how to balance the Cutter Engagement and find the most efficient way of removing material.

Case 1: Balancing DOC against changed WOC or vise-verse (Load Balancing)

Let's use the previous picture and assume our cutter is a 0.5" 3 flute Generic End Mill.
Default DOC and WOC for that kind of tool would look like this: DOC=1.0", WOC=0.150"

Set 1:
 

Now these cutting parameters are taken form the internal data base and consider Tool Type, Material being cut and even Tool Geometry.
Green color of the fields indicate that these values are ideal according to HSMAdvisor.

Let's now change the Width of Cut to full width as if we are slotting or pocketing: set WOC= 0.5"

Set 2:

As you can see default Depth of Cut (DOC) immediately changed its value and is now showing just 0.351" DOC instead of the previous 1.0"

This is it! You have just balanced Depth of Cut for the new Width of Cut you will be using.

It is noteworthy that while feed rate may change between the first two Sets of values, MRR or Material Removal Rate stays virtually the same.
This is the whole point of this Balancing exercise - to automatically adjust the other value keeping the load on the cutter the same.

Case 2: Setting both DOC and WOC to custom numbers (Feed Rate Balancing)

Let's now also change our Depth of Cut to 0.5"

Set 3:

As you can see none of the fields is green now, indicating that both of our values differ from the ideal parameters.

But if both values are not ideal, where did the difference go?

The difference went to Feed Rate. In this case Feed Rate will drop from 142 ipm to 100 ipm

When Cutter Engagement exceeds recommended values, HSMAdvisor tries to compensate the difference by reducing the feed rate.

When Cutter Engagement is less than recommended, Feed Rate may be increased, depending on the workpiece material.


Setting both the DOC and the WOC to custom numbers, however, leads to a nasty side-effect

As you increase cutter engagement in excess of default values, HSMAdvisor tries to reduce your Chip Load (Feed Rate).

Reduction in chip load leads to rubbing and premature tool wear.

It is HIGHLY recommended to balance at least one (DOC or WOC) without resorting to Feed Rate compensation


Both  DOC and WOC are set to custom values. How do I balance for one of them leaving the other one the same?

Simply Click on the text label in front of the filed you want to reset to default:

After Clicking on DOC label, Depth Of Cut re-sets  to the ideal in this circumstance value.


See Also


Adding New Tools to the Database

February 24, 2016, 8:50 pm by admin

The main point of having a Tool Database is to streamline access to frequently-used tool sizes and custom cutting data, preserving your manufacturing knowledge for future use by you and perhaps to share it with your co-workers.

Tools have to be added by clicking the "Add Tool" button on the "Tool Data" panel of the "Speeds and Feeds" tab.

Once a tool has been loaded, you will not be able to edit it's Tool geometry or access the "Add Tool" functionality. Please click on the "Edit New" or "Reset" button on the Tool Data panel to unload the current tool.

Adding a Tool to the Database

After entering your Tool geometry, it is encouraged to spend a few seconds adding it to your Tool Database so that you can reuse it later.

Just click on the "Add Tool" button. The following dialog will appear:

Here you can define the rest of the Tool Information that sets it apart from other tools in your database.

Please specify Tool Library, Its name, Brand Name, Series, etc.

You can also set handling information, the number of tools on stock, and set alert levels when stock is low.

After entering any of the information, you can click the "Add" button to save the new tool in the Database.

The dialog will then close the new tool will be loaded into the Speeds and Feeds tab.


You may like to learn about 

© Eldar Gerfanov

You can manipulate a large number of tools simultaneously by selecting multiple Tool records in the Tool Database tab.

You can select multiple tools in sequence using your mouse and/or keyboard.

When one or more Tool and/or Cut rows have been selected, you can perform various actions on them by right-clicking on the Tool Table control.

There are various methods for selecting Tools:

  • Select single row
    Left-Click on a tool record.
  • Selecting multiple rows by dragging the mouse
    Left-Click on a first row to be selected and drag the mouse up or down to select multiple rows
  • Selecting random multiple rows
    Press and hold the "Control" keyboard key and select rows by clicking and dragging the mouse across the rows you wish to select.
  • Selecting a range of rows between first and last selected rows
    1. Select the first row of the range
    2. Press and hold the "Shift" keyboard key
    3. Select the last row of the range
    4. All rows between the first and the last will be selected.

Tool Database Tool/Cut record actions

Once Tool/Cut rows have been selected, you can perform various actions on them by right-clicking on the Tool Table control. A context pop-up menu will show up:

Depending on the number and the kind of selected records, various options will be available:

  • When a single Tool or Cut is selected in addition to common actions, You can Load Tool or Cut into HSMAdvisor or View its Information
    When multiple Tools/Cuts are selected, Load and View Information options are disabled
  • When at least one tool is selected Copy To... or Move To..., options are available allowing you to copy/move the selected tool(s) to another Tool Library
    All cuts attached to selected tools also get copied. A Cut can only be copied together with its parent tool.
  • You can Delete selected items by clicking the Delete option.
    If a tool is being deleted, all its cuts will be deleted as well.
    It is possible to delete only the Cuts by selecting the corresponding rows.
  • Mass Quick Edit sub-menu allows you to do the following actions:


    The availability of certain options will vary depending on the number and the kind of rows that have been selected:
  • Clone Tool/Generate Sizes is available when a single Tool record is selected.
    It allows you to create a list of tools using the selected one as a template.
    The tools' starting and ending diameters and the diameter step-up will be defined in a series of questions.
  • The rest of the Mass Quick Edit options are self-explanatory.
    Whenever in doubt, copy tools into a new test library and perform these actions there to make sure you do not adversely affect the existing rows.
  • Tool Ordering sub-menu is available when at least one tool record is selected.
    It allows you to quickly add tools to the Request List for further ordering through your purchasing department.

You may like to learn about 

© Eldar Gerfanov

HSMAdvisor Shared Drive Databases

July 26, 2023, 11:54 pm by admin

HSMAdvisor's shared drive databases enable multi-user collaboration and data synchronization. When a tool database file is located on a shared drive, multiple instances of HSMAdvisor can read and write to it, allowing concurrent access. Any changes made to the tools within the database are automatically updated across all instances, ensuring data consistency.

To share the tool database:

  1. Use the "Tool Database-> Actions -> Save Database As ..." menu item to save the currently-loaded database file in the new shared location, such as Dropbox or OneDrive. The current HSMAdvisor instance will immediately start using the database file you have just created.
  2. Once the shared database file is in place, other HSMAdvisor instances can connect to it using the "Tool Database-> Actions -> Open Tool Database..." menu item in the Tool Database tab.

Optional file compression

The database file can be quite large if your database has many thousands of tools.
This may make reading and writing in the Network-shared locations quite sluggish.

In such a case consider enabling the "Compressed Tool Database" option located in the Settings tab.
This will tell HSMAdvisor to transfer and store your Tool Database file in ZIPped format, making file operations blazingly fast even on slow networks.

Uncompressed size:

Compressed size:

You may like to learn about 

Supported Tool Types

March 23, 2016, 3:22 pm by admin
  • Solid End Mill
  • Solid Ball Mill
  • HP/Roughing End Mill
  • Indexed End Mill
  • Indexed Ball Mill
  • Indexed Face Mill
  • Jobber twist Drill
  • Reamer
  • High Feed Mill
  • Hi-Helix Parabolic Drill
  • Straight Flute for hard metal
  • Spade Drill
  • Thread Mill
  • Helical Indexed End Mill
  • V-bit Engraver
  • Turning-Profiling
  • Turning-Grooving
  • Turning-Boring
  • Tap
  • Forming Tap
  • Counterbore
  • Chamfer Mill
  • Indexed Drill
  • Boring Head

Supported Tool Materials

March 23, 2016, 3:24 pm by admin
  • HSS
  • HSCobalt
  • Carbide
  • Diamond
  • Ceramic