About Tool Database

February 15, 2016, 8:41 pm by admin

An integral part of HSMAdvisor is its powerful Tool and Cut Database.

Tool Database allows you to store your tools in one convenient location, sparing you the time needed to key in your tool type, size, etc.
It is very flexible and, since its inception, has grown both in size and functionality.

With every update, the list of its features keeps growing, and at present, it can (among many other things) do the following:

  • Store and Edit geometric Tool data, Including automatic creation of tool data from a sample tool entry.
  • Store/Create/Manage Custom Tool Manufacturer Cutting data using Manufacturer Brand/Series names.
  • Store and Manage Tool Handling data like Number of Tools in stock, Ordering Vendor Information, Physical location in the shop
  • Set up Low Tool Stock warning levels and add tools that are low on the stock to a Request List to be ordered.
  • Create and Export customizable Tool Request Orders for use in purchasing.
  • Restock received tools into the Tool Database
  • Attach Cutting Data (Known as just "Cuts") to tools for various cutting scenarios in different materials.
  • Store complete MasterCAM Tool and ToolPath parameters for easy importing/Exporting of MC operations
  • Organize Tools into Libraries
  • Share a single Tool Database between many HSMAdvisor seats in real-time.
  • Import Tool Databases from Fusion 360 in .hsmlib (HSMWorks) format.

 In the following articles, we will describe the main functions of the Tool Database.
Tool Database Tab

February 24, 2016, 7:49 pm by admin

Most Tool Database controls are located on the Tool Database tab.

Here is a quick overview of it's main elements:


You may like to learn about

Database Actions

February 24, 2016, 8:05 pm by admin

Database Actions menu allows you to perform such major actions as Create/Open a new Tool Database and Import/Export/Create Tool Libraries.

To access Tool Database actions, you need to go to the Tool Database tab and click on the "Actions" button in the top-right corner.

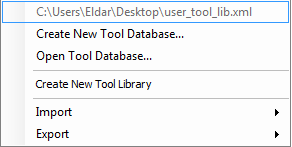
A pop-up menu will show:

List of Database Actions

  • The very first option is not active. It only shows the location of the currently-opened database file.
  • Create New Tool Database
    You will be prompted to set a location for a new empty Tool Database.
  • Open Tool Database
    You will be prompted to select a Tool Database file to load into HSMAdvisor
  • Create Tool Library
    Click to create a new empty Tool Library in the current Database.
  • Import
    Click to Import Tool Libraries from an outside Tool Database file
    You can use this action to merge several Tool Database files in one effectively.
    Should there be a conflicting Tool Library name, you will be prompted to rename the Libraries you are Importing.
    Currently, you can import database files created by HSMAdvisor and Fusion 360
  • Export
    Click to export some or all Tool Libraries into a new Tool Database file.
    You will be prompted to select the Libraries you are exporting and specify the new Tool Database file.
    Currently, you can export database files in the HSMAdvisor format only.

You may like to learn about 


© Eldar Gerfanov

Tool Ordering

December 16, 2018, 11:33 am by admin

Custom Speeds and Feeds

January 16, 2020, 5:43 pm by admin

HSMAdvisor allows users to create their own Speeds and Feeds tables for various Tool-material combinations.

Custom Speeds and Feeds tables (aka Custom SF Tables) are linked to the tool by using the combination of manufacturer's Brand Name, Series Name, and optionally Insert Name (aka. Manufacturer Names)

Whenever the tool's Manufacturer Names match one of the Custom SF Tables, HSMAdvisor tries to fetch the custom Speed and Feed information for the currently selected material. The Custom Speeds and Feeds panel will then display a green "M" icon.

If Custom SF Table contains a definition for a Material Group, all materials withing such Material Group will have the same custom Speeds and Feeds.
Is this case, the Icon will be Yellow/Green - A/M

Here is how the whole process looks like from the creation of the tool to the creation of the Custom SF Tables:

You may like to learn about 


© Eldar Gerfanov

By logging in to HSMAdvisor Cloud on both FSWizard and HSMAdvisor using the same account name, the uploaded Tools will automatically synchronize between the two applications.

Currently, you can only have access to the tools you have created, but we are working on adding "companies" or "shops" where multiple user accounts can work in one shared cloud workspace.

Cloud libraries in FSWizard

When attempting to use the Cloud Tool control, if the user is not signed in, a dialog shows up prompting to either sign in or register:

Upon signing in, the user can store and recall tools from the HSMAdvisor Cloud:

To use cloud libraries in HSMAdvisor

Register and/or Log-in to the HSMAdvisor Cloud by clicking on the Cloud icon on the bottom toolbar.
If your account already has any cloud libraries, they will be downloaded to your computer.

Select libraries for cloud sync.

  1. Select the Tool Library that you want to sync with the cloud.
  2. Click on the "Actions->Tool Library" menu item.
  3. Enable the "Sync with HSMAdvisor Cloud" option.
  4. Synced tools are now available on both apps:

You may like to learn about 

Tool Library Actions

February 24, 2016, 8:26 pm by admin

Tool Libraries were created to better organize tools in the Tool Database.

"Tool Library" is simply a group of Tools that share the same "Library Name" tag.
You assign Library Name to a tool when you initially create it.

Creating a new Tool Library

You can create a Tool Library through the Tool Database "||| Actions" menu.
A new Tool Library can also be created when adding a new tool to the Tool Database by typing the new name in the "Tool Library" input box

Once a Tool Library has been created a host of actions can be done to it:

  • Rename
  • Merge a Tool Library with another one
  • Delete Tool Library


© Eldar Gerfanov

Adding New Tools to the Database

February 24, 2016, 8:50 pm by admin

The main point of having a Tool Database is to streamline access to frequently-used tool sizes and custom cutting data, preserving your manufacturing knowledge for future use by you and perhaps to share it with your co-workers.

Tools have to be added by clicking the "Add Tool" button on the "Tool Data" panel of the "Speeds and Feeds" tab.

Once a tool has been loaded, you will not be able to edit it's Tool geometry or access the "Add Tool" functionality. Please click on the "Edit New" or "Reset" button on the Tool Data panel to unload the current tool.

Adding a Tool to the Database

After entering your Tool geometry, it is encouraged to spend a few seconds adding it to your Tool Database so that you can reuse it later.

Just click on the "Add Tool" button. The following dialog will appear:

Here you can define the rest of the Tool Information that sets it apart from other tools in your database.

Please specify Tool Library, Its name, Brand Name, Series, etc.

You can also set handling information, the number of tools on stock, and set alert levels when stock is low.

After entering any of the information, you can click the "Add" button to save the new tool in the Database.

The dialog will then close the new tool will be loaded into the Speeds and Feeds tab.


You may like to learn about 

© Eldar Gerfanov

You can manipulate a large number of tools simultaneously by selecting multiple Tool records in the Tool Database tab.

You can select multiple tools in sequence using your mouse and/or keyboard.

When one or more Tool and/or Cut rows have been selected, you can perform various actions on them by right-clicking on the Tool Table control.

There are various methods for selecting Tools:

  • Select single row
    Left-Click on a tool record.
  • Selecting multiple rows by dragging the mouse
    Left-Click on a first row to be selected and drag the mouse up or down to select multiple rows
  • Selecting random multiple rows
    Press and hold the "Control" keyboard key and select rows by clicking and dragging the mouse across the rows you wish to select.
  • Selecting a range of rows between first and last selected rows
    1. Select the first row of the range
    2. Press and hold the "Shift" keyboard key
    3. Select the last row of the range
    4. All rows between the first and the last will be selected.

Tool Database Tool/Cut record actions

Once Tool/Cut rows have been selected, you can perform various actions on them by right-clicking on the Tool Table control. A context pop-up menu will show up:

Depending on the number and the kind of selected records, various options will be available:

  • When a single Tool or Cut is selected in addition to common actions, You can Load Tool or Cut into HSMAdvisor or View its Information
    When multiple Tools/Cuts are selected, Load and View Information options are disabled
  • When at least one tool is selected Copy To... or Move To..., options are available allowing you to copy/move the selected tool(s) to another Tool Library
    All cuts attached to selected tools also get copied. A Cut can only be copied together with its parent tool.
  • You can Delete selected items by clicking the Delete option.
    If a tool is being deleted, all its cuts will be deleted as well.
    It is possible to delete only the Cuts by selecting the corresponding rows.
  • Mass Quick Edit sub-menu allows you to do the following actions:


    The availability of certain options will vary depending on the number and the kind of rows that have been selected:
  • Clone Tool/Generate Sizes is available when a single Tool record is selected.
    It allows you to create a list of tools using the selected one as a template.
    The tools' starting and ending diameters and the diameter step-up will be defined in a series of questions.
  • The rest of the Mass Quick Edit options are self-explanatory.
    Whenever in doubt, copy tools into a new test library and perform these actions there to make sure you do not adversely affect the existing rows.
  • Tool Ordering sub-menu is available when at least one tool record is selected.
    It allows you to quickly add tools to the Request List for further ordering through your purchasing department.

You may like to learn about 

© Eldar Gerfanov

HSMAdvisor Shared Drive Databases

July 26, 2023, 11:54 pm by admin

HSMAdvisor's shared drive databases enable multi-user collaboration and data synchronization. When a tool database file is located on a shared drive, multiple instances of HSMAdvisor can read and write to it, allowing concurrent access. Any changes made to the tools within the database are automatically updated across all instances, ensuring data consistency.

To share the tool database:

  1. Use the "Tool Database-> Actions -> Save Database As ..." menu item to save the currently-loaded database file in the new shared location, such as Dropbox or OneDrive. The current HSMAdvisor instance will immediately start using the database file you have just created.
  2. Once the shared database file is in place, other HSMAdvisor instances can connect to it using the "Tool Database-> Actions -> Open Tool Database..." menu item in the Tool Database tab.

Optional file compression

The database file can be quite large if your database has many thousands of tools.
This may make reading and writing in the Network-shared locations quite sluggish.

In such a case consider enabling the "Compressed Tool Database" option located in the Settings tab.
This will tell HSMAdvisor to transfer and store your Tool Database file in ZIPped format, making file operations blazingly fast even on slow networks.

Uncompressed size:

Compressed size:

You may like to learn about